Before you grab a ladder and load up on shingles, you should know that roofing is not easy work. Despite the difficulty, many professional roofers are proud of their trade and make a good living from it! To keep you safe and prepared, let’s go through the basics.
“The first thing you’ll want to consider is if you actually have what it takes to be a roofer, then you can go over some basic roofing knowledge, and finally look at the process of roofing a house.” – Blaine Roofing
What does it take to be a roofer?
There are quite a few skills, tools, and materials required to roof a house. Before anything else you should ask yourself, are you afraid of heights? If so, carrying heavy stacks of shingles 10 to 12 feet into the air might not be for you. Roofing does require you to be in good physical shape and have solid balance as well. In the world of roofing, time is money! That’s why it’s not uncommon to see a roofer rush up a ladder with 180 lbs of shingles on their back:

Skills Required To be a Roofer
- Carpentry skills – an understanding of how to use hand tools and power tools
- Good balance – Roofs come in different heights and angles and you’ll need to be sure-footed
- Basic math skills – for determining quantities of material needed and measuring as well.
- An appropriate sense of caution – to avoid slips and falls
Tools Needed
- Extension Ladder
- Roof Jacks
- Compresor and Generator
- Various Hand Tools/ A Tool Pouch
- Different types of Pry Bars
- Tin Snips
- Tape Measure
- Chalk Lines
- Nail Gun
- Circular Saw
- Power Drill

Basic Roofing Knowledge
You have the skills and tools to get started, can you open that roofing business you’ve always dreamed of yet? Not quite. The next step is understanding the composition of a roof and knowing what your options are for materials.
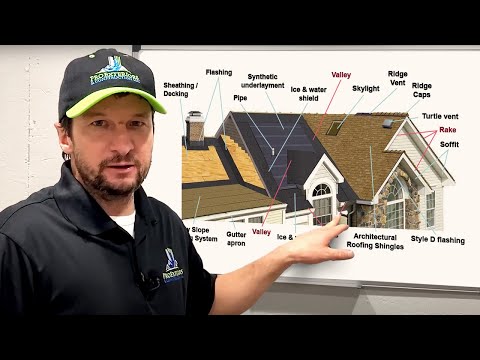
What is a Roof Made of?
There are four basic roofing components that make up the structure of a roof:
Shingles – Your first layer of protection against weather. There are different types of shingles, we list the pros and cons of each below!
Underlayment – An additional layer of insulation that seels the roof off from water and moisture. It’s made of a black water-resistant, paper-like material. As the name suggests, it goes beneath the shingles or tile of the roof.
Flashing – Metal pieces that are used to prevent water or snow from pooling up on the roof in places like the valleys or hips of the roof.
Trim – Protects the seams in the roof
Roofing Terms
Check out this veteran roofer break down the composition of a roof and also go over 16 of the most common terms that you should know.

Different Types of Roofs – Pro’s and Con’s
Asphalt shingles are by far the most common material used for roofing but there are other options to consider. Your choice for roofing material can be based on quality, cost, durability, aesthetics, and the geographical location of the roof.
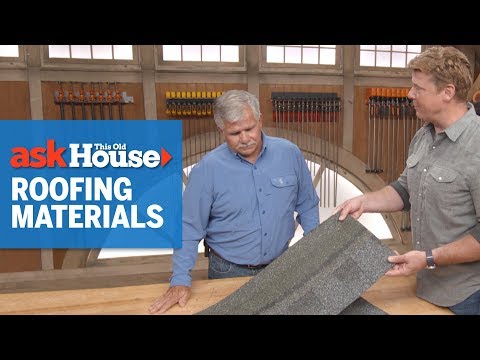
Asphalt Shingles are used around the world and are made of fiberglass or felt with a layer of asphalt.
Pros – Cost-effective, fire-resistant, easy installation and repair
Cons – Lower life expectancy and higher-maintenance
Wood Shingles are made from various types of wood and are more common in warmer climates.
Pros – Beautiful aesthetic and a longer lifespan.
Cons – Flammability is a concern, as well as the cost of installation and the maintenance required.
Metal Roofs can be laid over an existing roof. They are made from different metals such as steel, copper, galvalume, and more.
Pros – Durable, low maintenance, and energy-efficient.
Cons – Significantly more expensive than an asphalt roof and difficult to install.
Tile Roofs are commonly used in warm and tropical climates. Tile is made of clay or concrete and available in a variety of colors.
Pros – Extremely durable, unique look, non-flammable, and a very long lifespan
Cons – One of the most expensive options and has a very complicated installation process.
The Process of Building a Roof
Now that you understand the composition of a roof and you’ve brushed up on your terminology, we can look at the basic process of roofing a house. We’ll break it down step by step, keeping in mind that this is a simplified version of the process for learning purposes. After all, this is roofing basics for dummies.
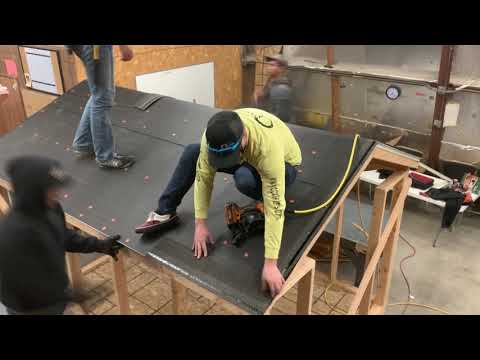
Step 1: Remove the Old Roof – Out with old, in with the new. This is somewhat straightforward but does require the use of some of the tools mentioned above such as pry bars and hammers.
Step 2: Install the Drip Edge – Although not always mandatory, a drip edge is installed to prevent water from falling on the siding of the house.
Step 3: Lay Out the Underlayment and Felt Paper – This requires measurement and precision. You want your underlayment to be as flat and straight as possible.
Step 4: Install the Shingles – Begin by applying starter shingles at the edge of the roof. Then, you install the rest of the shingles in an overlapping pattern.
Step 5: Install the Flashing and Ridge – Flashing is used to waterproof certain areas of the roof that could collect water like the valleys. The ridge is a special shingle that caps the peak of the house.
We hope you enjoyed reading through these roofing basics! You might not be a pro quite yet, but you’re no dummy. If you need help on the marketing side of your roofing business, take a look at our other contractor marketing resources here!